
 English (Canada)
 čeština (Česká republika)
 magyar (Magyarország)
 Deutsch (Deutschland)
 eesti (Eesti)
 español (España)
 português (Portugal)
 suomi (Suomi)
 français (France)
 English (United Kingdom)
 italiano (Italia)
 Nederlands (Nederland)
 norsk, bokmål (Norge)
 polski (Polska)
 svenska (Sverige)
 Türkçe (Türkiye)
Proper installation procedures & tools for metal roofing & cladding panels
In the majority of roofing and cladding applications, metal panels are installed onto substructures. Although seemingly trivial, the selection of the correct tools and the application of proper installation procedures is paramount for the completion of a successful job. This document will outline the necessary tools and techniques required to ensure installers successfully complete projects without damaging fasteners or application substrates
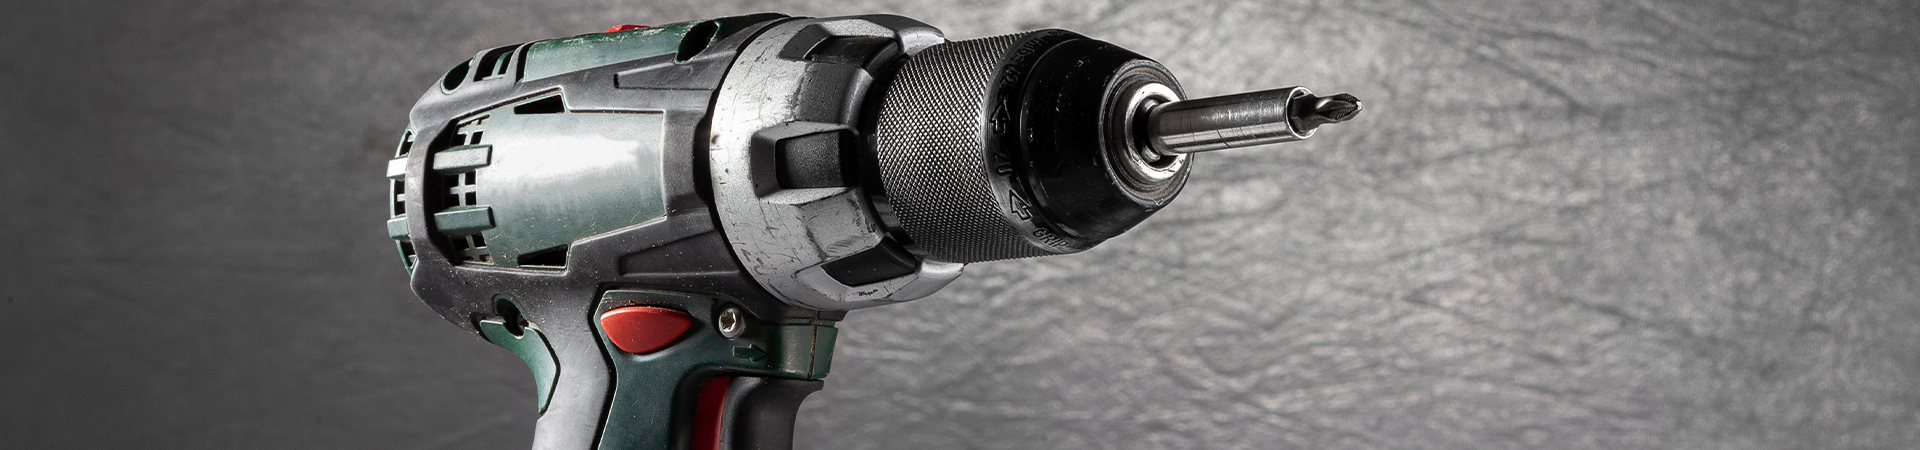
Select the correct drive bits & metal panel installation procedure
Selecting an incorrect drive bit can result in serious efficiency and performance issues. It is recommended that a recessed magnet is used for external drive fasteners, and the correct size and design drive bit is always used for internal drive fasteners.
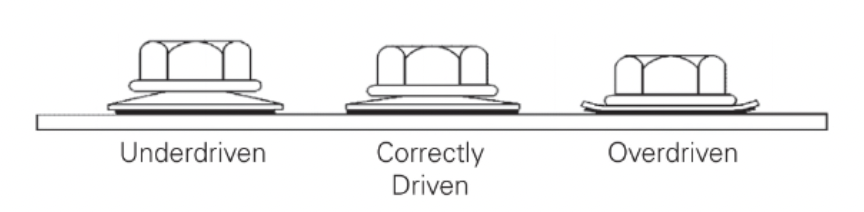
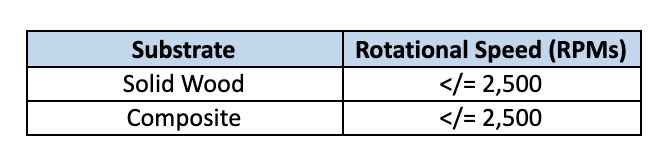
It is equally important to properly tighten fasteners into the application substrate. The majority of roofing and cladding fasteners will feature some type of bonding washer to provide a water-tight seal. Care must be taken to correctly drive these parts into metal panels. Use the image below as a guide.
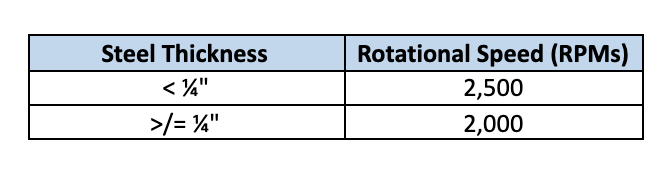
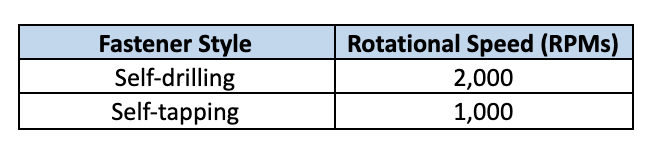
 Metal panel installers should also take care to select a drill gun set to the correct rotational speed (RPMs). The following charts can be used as general guides for selecting the correct installation speed. However, it is a good idea to check with the fastener manufacturer for exact specifications.
Carbon Steel or 410 Stainless Steel
300 Series Stainless Steel
Wood Applications
 Source: (Metal Construction Association)
Which to use for metal roofing or cladding panels: drill guns or impact drivers?
Although similar in appearance, drill guns and impact drivers have differences that will affect the performance of SFS fasteners. During metal panel installation, drill guns provide a constant rotational torque. In contrast, impact drivers produce more torque applied in short bursts. This results in "impacts" which drive screws more effectively. In addition, impact drivers are typically more compact and tend to slip less frequently.
On the surface, impact drivers appear to be an obvious improvement over drill guns. However, the increased torque and "impact" action may result in damages to the fastener, the sealing washer, and the installation substrate.
Fastener damage
Fasteners can be damaged in three different ways by impact drivers. First, for painted fasteners, chipping and damage can occur. This will result in both unfavorable appearance and increased corrosion risk on most parts.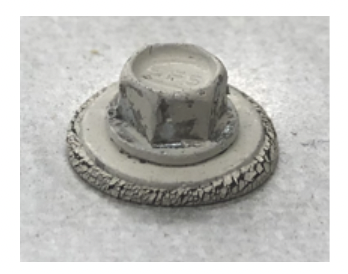
Second, depending on the material composition of the fastener, the internal or external drives can be damaged. For soft stainless alloys and zinc/aluminum alloys, the use of an impact driver can permanently deform internal drives and "grind-down" external drives. In some cases, the drive will wear down prior to full installation. In addition, repair teams will have difficulty uninstalling the part if roof replacements are required.
 Finally, the rotating and cutting action caused by drill points can cause fasteners to "burn up". At increased torques, installers risk generating excessive heat that damages the fastener points. This will result in the inability to install the fastener and can cause damage to the substrate. Slower RPM screw guns tend to avoid these potential issues.
Washer damage
The increased rotational speed and torque of impact guns can result in the overdriving of parts. In addition to damage caused to the head of the fastener, there is an increased risk of water damage. If a fastener is overdriven into the metal panel, the assembled washer may not properly seal or be irreversibly damaged. This may result in future leaks and water damage.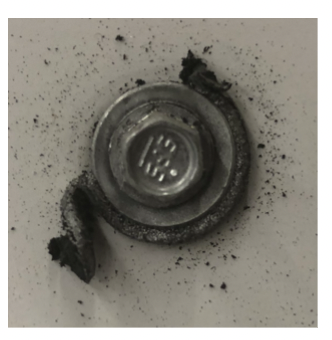
Installation substrate
The application substrate can also be seriously damaged by using the incorrect tool for fastener installation. For instance, increased rotational speed (RPMs) can result in the formation of burrs on metal panels. These burrs can compromise sealing washers and increase corrosion risk.
In wood and composite applications, RPMs above 2500 can result in damage to the attachment substrate. This results in compromised holding strength and can sometimes lead to application failure below provided design values.
Frequently asked questions about metal panel attachment
Should I use a regular drill gun or an impact gun to install metal roofing panels?
Installers should always use regular drill guns to install metal roofing and cladding panels. Impact guns apply increased rotational torque which can damage the parts and make installation impossible.
Does it matter what speed I set my drill gun to when installing metal roofing panels?
Yes, the rotational speed or RPM should be set in accordance with the roofing application. Wood substrates and metal substrates should be installed at different speeds. Refer to the tables above to determine the correct drill speed for your application.
Do metal shavings, burrs, or pigtails cause damage to the roof?
Metal shavings and pigtails cause damage to exposed fastener roof systems. It is important to avoid the “canning” or burring that occurs when installing fasteners into metal roofing applications. They can contribute to corrosion, cause leaks, and potentially lead to serious damage. Always ensure the proper drill gun is used and set to the correct rotational speed.
How do I avoid damaging rubber washers in metal roofing applications?
When installing fasteners with attached rubber washers it is important to avoid squash out failures. This occurs when the fastener is over-driven into the application substrate. To avoid this type of damage, always use a standard drill gun set to the correct RPM. See the above charts and images for guidance.
Key takeaways from our metal panel installation tips
Contractors should always ensure their teams are fully aware of proper installation procedures and tools for metal panel applications. Refer back to this guide anytime for guidance in future projects, or contact SFS for additional tips and strategies.
For additional learnings, read Fine Thread Versus Coarse Thread or How to Choose the Correct Screw Length.